Showing posts with label Recipes. Show all posts

Thursday, September 17, 2015

Tried & True Recipe: Chicken Apple Cranberry Salad with Honey-Balsamic Vinaigrette


Fall arrives in less than 6 days, but with temps still in the 80s I'm not yet ready to transition to all those warm yummy comfort foods (like soup!) that will surely start popping up on my menu in a few weeks.  I love to eat salads during warm weather months, just like I love to eat soup during cold weather months.  It drives my husband a little nuts, but I'm definitely one of those people with strong weather-related food associations.  Warm weather is for grilling, salads, lighter fare, and food that doesn't require heating up your house for hours to cook it.  Cold weather is for sooouuuppps(!), stews, comfort foods, and things that can cook away for hours heating up your kitchen before they heat up your belly.

Salad is on our menu nearly weekly during warm weather months.  It's easy to throw together, versatile, everyone can top their salad to their preference, and leftovers are good.  The very best salads have a variety of ingredients with different, complimentary flavors and textures.  I've already shared one of my very favorite summer salads, allow me to introduce you to it's late summer/early fall counterpart: a chopped salad with chicken, apples, dried cranberries, blue cheese, and pecans, topped with sweet and tangy honey-balsamic vinaigrette.  This salad is well-balanced, fall-ish, and takes advantage of seasonal produce (apples!), but is still light and refreshing.


Chicken Apple Cranberry Salad with Honey Balsamic Vinaigrette
Honey Balsamic Vinaigrette inspired by Brown Eyed Baker


For the vinaigrette:

2T Balsamic Vinegar
1/4 c Extra-Virgin Olive Oil
2T Honey
1/2 T Dijon Mustard
1/4 t Salt
1/8 t Ground Black Pepper
1/8 t Garlic Powder

Combine ingredients in small mason jar or other container with a tight seal.  Shake until well combined and set aside.  Can be made in advance and keeps well stored in the refrigerator.  Yields ~3/4 cup.


For the salad:

Romaine Lettuce (or other lettuce of choice: spring mix/spinach blend, baby kale, or rubbed kale would be good here)
Diced Grilled Chicken (we season ours with salt, pepper, and garlic powder)
Diced Granny Smith Apple (I like Granny Smith's for salad because they're firm and crunchy and have a nice tangy flavor, but whatever you prefer)
Blue Cheese (or Feta)
Craisins
Pecans (or Walnuts)

Combine ingredients to your preference and top with honey-balsamic vinaigrette.  Easy peasy. Obviously, the ingredients are super flexible, that's another thing I like about salad.  Switching a few things up will make a similar, but slightly different salad!  Bacon would also be a good addition, because bacon is always good.


Friday, April 4, 2014

Tried & True Recipe: Sweet Potato Nachos


I love sweet potatoes and my favorite ways to eat them always involve spicing them up a bit!  Sweet potatoes are especially tasty combined with Mexican-style spices or other flavors like BBQ or chili for a sweet-savory combo.  A quick meal I love are baked sweet potatoes topped with BBQ meat or chili that I pull from the freezer.  Quick, healthy, and filling!  Another regular favorite of ours are these Baked Sweet Potato Fries that are seasoned up with Mexican-style spices.

When I saw these Sweet Potato Nachos I thought - genius!  I can't believe I've never thought of this before!  These came together with just a few minutes of work, everyone was able to top their portion how they wanted, and it was a hit with the whole family!  This will definitely be a quick go-to meal for us that will surely be making a regular appearance on our menu!


Sweet Potato 'Nachos'
Inspired by Peas & Crayons

3-4 Sweet Potatoes (depending on size and need.  I used 3 1/2 sweet potatoes and that filled a large baking sheet yielding enough for dinner + some leftovers for lunch the next day), peeled and sliced into rounds ~1/4" thick
Taco Seasoning (I just used the taco seasoning I always keep on hand, but you could certainly just sprinkle some chili powder, cumin, garlic and onion powders, salt and pepper, and maybe just a little pinch of cayenne for a kick!)
Oil (I would recommend coconut or extra virgin olive oil), for spraying or drizzling

Preheat oven to 400-degrees.  Drizzle/spray a large baking sheet with oil to prevent sticking.  Arrange potato rounds in single-ish layer (it's okay if they overlap a little, but try to get a single layer as much as possible) and drizzle/spray rounds with oil.  Sprinkle seasoning to taste.  Bake 30 minutes or until potatoes are tender.  Top with warm toppings (I added cheese and beans here) and pop back into the oven for a few minutes to allow toppings to heat and melt.  Remove from oven and serve with your favorite toppings!

Nacho toppings: we topped ours with cheese and black beans, and to my portion I added lettuce, tomatoes, salsa, pickled jalapeno slices, sour cream, and guacamole.  Another great topping would be some taco-seasoned meat, but feel free to add whatever you like to eat with your nachos!  These would also be awesome as chili cheese nachos, or BBQ nachos.

I love nachos!  Keep in mind these are definitely roasted sweet potatoes.  They're not going to be crispy like a tortilla chip, but the seasoned sweet potatoes make such a delicious and nutritious base for all your favorite toppings!

Give it a try!

Saturday, March 22, 2014

Tried & True Recipe: Turkey (or Chicken) Pot Pie

Not as appetizing before it bakes as it is when it's all nice and golden brown, but it's something!

Every year around Thanksgiving I like to roast a turkey just for our little family.  Mark loves turkey (and leftover turkey sandwiches). Molly seems to be following in his footsteps as meat (turkey included) seems to top her lists of favorite foods at the moment.  I like it okay, but what I like most about it is that around Thanksgiving time stores are practically giving them away and for about the same amount of effort that it takes to roast a chicken I get so much meat for my time and money!  One turkey will yield multiple meals and leftovers and plenty of good for you, tasty stock.

One of the meals I love to make with the cooked turkey is Turkey Pot Pie.  This recipe is SO. GOOD.  It's easy to double and it's freezer friendly!  Basically, I love it.  I'll be honest, it does take a bit of work to make the filling, sauce, and crust, but it's well worth the effort (especially if you double it!)!  I'm so thankful I put in the time and effort previously when I pull a pot pie out of the freezer and pop it right into the oven and we can enjoy an awesome home cooked meal with barely any work!

We recently had one of these tasty pot pies from the freezer and it reminded me that I need to share the recipe while we're still in comfort food mode.  I don't know about you, but it's still plenty chilly in my area and pot pie makes a great cold weather meal!

This recipe works just as well with chicken, just use what you have/prefer.


Turkey (or Chicken) Pot Pie
Adapted from Annie's Eats originally from The Pastry Queen

yields 2 family size (9 inch) pies or 6-8 individual size pies


For Filling:

3 tablespoons unsalted butter
1 medium onion, chopped
1 large carrot, chopped
1 large Russet potato, chopped
3 cloves garlic, minced
3-4 cups chopped/shredded turkey (or chicken, can also use the meat from a rotisserie chicken)
1 cup frozen peas
1/2 teaspoon crushed red pepper flakes
salt and pepper, to taste


For Sauce:

8 tablespoons unsalted butter
1 cup all-purpose flour
2 1/2 cups turkey stock (or chicken stock)
1/2 cup heavy cream
dash of hot sauce
salt and pepper, to taste


For crust*:

16 tablespoons cold butter, cut into 1 tablespoon pieces
3 cups all-purpose flour
10 ounces cream cheese, cut into large cubes
1 teaspoon salt
1/4 teaspoon pepper
1 large egg (for egg wash)


To prepare filling:

Melt butter in large skillet over medium heat.  Add onion, carrots, and potatoes to pan and saute, stirring occasionally, until veggies start to soften (~10-15 minutes.  Note: as pies will be cooked in the oven be sure not to overcook veggies at this stage you just want them to start softening up.  This is especially important if you're going to be freezing the pies!).  Add garlic and cook until fragrant.  Turn off heat.  Stir in turkey, peas, crushed red pepper flakes, and salt and pepper, to taste.  Set aside.


To prepare sauce:

Melt butter in large saucepan over medium heat.  Whisk in flour until smooth.  Cook flour for a minute or two.  Whisk in broth until smooth and cook, stirring frequently, until it reaches the consistency of "cream of" soup (nice and thick!).  Stir in cream, hot sauce, and salt and pepper, to taste.

Combine sauce with filling mixture and spoon into pans.  I like to use disposable 9" pie pans.  You can use real pie plates, individual sized disposable pie plates, ramekins, etc.


To prepare crust:

To bowl of a food processor fitted with metal blade, pulse butter and flour until crumbly.  Add cream cheese, salt, and pepper.  Continue pulsing just until dough begins to form.  Turn dough out onto a floured surface and roll out to 1/4-inch thickness.  Lay dough on top of filled dishes.

In a small dish beat the egg with a little water.  Using a pastry brush, brush egg wash over crusts.

Freeze at this point or bake on a cookie sheet as instructed below.


To bake: 

     From fresh:  40-45 minutes at 375-degrees

     From refrigerator (frozen and then thawed): 50-55 minutes at 350-degrees

     From frozen:  Remove from freezer 30 minutes prior to baking and allow to sit at room temperature.  In the meantime, pre-heat oven to 425-degrees.  Cover pie loosely with foil and bake for 30 mins.  Reduce heat to 350-degrees.  Remove foil and continue baking for an additional 55-60 mins, or until crust is golden brown and pie is bubbly and heated through.  Sometimes I cover loosely with foil again towards the end if the crust is getting too brown.  Just keep an eye on it!

Decrease times slightly  if you're cooking individual sized pies.  Let stand 5-10 minutes before serving.


*A note about doubling the crust.  When I double this recipe I use 2x the ingredients for everything except the crust.  I've found I only need to increase the crust by 50% and I have plenty.  If you're making 12-16 individual pies you may end up needing 2x the crust, I'm not sure.  When doubling I also make the crust in two batches so as not to overload my food processor.  


Enjoy!

Friday, November 8, 2013

Tried & True Recipe: Buffalo Chicken Chili


One of the few things I look forward to as the weather turns colder is an excuse to make yummy soups for dinner.  I'm a huge fan of soup (consequently, that's why so many of the recipes I share are for soup!) and as we move away from grilling weather that means more time for soup!  I made this Buffalo Chicken Chili for the first time recently and it's so good I just had to share!  It comes together super quickly, has tons of flavor, is a crowd pleaser, and makes for great leftovers.  That makes for a recipe win in my book!

Try it out this weekend, it's great football watching food.

Happy Friday!


Buffalo Chicken Chili
Adapted from Rachel Ray as seen on Tracey's Culinary Adventures

1T extra-virgin olive oil
1 lb ground chicken
2 large carrots, peeled and chopped
1 medium onion, chopped
2 ribs celery, chopped
4 cloves garlic, minced
2T chili powder
1T ground cumin
1T smoked paprika
1/2 t salt
1/4 t black pepper
2c low-sodium chicken broth
1/2 cup cayenne pepper hot sauce (like Frank's)*
1 (15oz) can diced fire-roasted tomatoes
1 (15oz) can Great Northern beans, drained and rinsed


Heat oil in large pot over medium heat.  Add chicken, breaking it up with a spoon as it cooks.  Once chicken is browned, add carrots, onion, and celery and cook, stirring frequently, until softened (8-10 minutes).  Once veggies are nearly soft, add garlic and spices and cook until fragrant (~1 minute).  Stir in chicken broth, scraping the bottom of the pot to release any browned bits.  Stir in hot sauce, tomato sauce, tomatoes, and beans.  Bring the mixture to a bubble and simmer for 15-30 minutes to allow flavors to combine and veggies to soften.

I enjoyed this chili topped with a little shredded Monterey Jack cheese, a few blue cheese crumbles, some crushed tortilla chips, and a scoop of sour cream.  Sliced green onions or chopped white onions would also be a great addition and any kind of cheese will be tasty.  Whatever you typically like with your chili will probably work well here.

*I found that 1/2 cup of hot sauce was surprisingly enough to lend flavor and a touch of heat to the chili.  If you would like more buffalo flavor and heat increase the amount to 3/4 cup.  You could also add the hot sauce to individual bowls if some people want more than others.  

Enjoy!

Tuesday, September 24, 2013

Tried & True Recipe: Whole-Wheat Oatmeal Bread


This is an awesome recipe for hearty, flavorful, whole-wheat bread.  It's great for sandwiches and makes the best toast!  I always try to have some on hand.


Whole-Wheat Oatmeal Bread
Originally from Good to the Grain.  As seen on Seeded At The Table

1c Water
1c Milk
1T Yeast
2 1/2 c Whole-Wheat Flour
2c Bread Flour
1c Rolled Oats (a.k.a. Old-Fashioned, just not the quick cook stuff)
scant 1T Salt
1T Honey
2T Molasses
4T Unsalted Butter, melted


Warm water and milk.  Add yeast to liquid mixture and set aside to bloom.  Meanwhile, add remaining ingredients to mixer fitted with dough hook.  Add liquid/yeast mixture.  Turn mixer to medium speed and allow dough to knead ~8 minutes.  

Leave dough in bowl and set aside, in a warm spot, covered with a towel to rise until doubled (~1hr).

Shape loaf and place in a greased bread pan.  Cover and set aside, in a warm spot, to rise until doubled (~50mins-1hr, you don't want to over-rise or it will create holes in your bread)

Pre-heat oven to 400-degrees.

Bake bread for 30-40 minutes (until when tapped it sounds hollow).  Remove from oven and cool on a wire rack.  Remove bread from pan promptly.


Notes:

I recommend waiting several hours/overnight to slice the whole loaf.  I also recommend storing slices in the freezer if you're not going to be using them within a day or two.  Homemade bread doesn't have preservatives like the store-bought stuff so it doesn't stay fresh for long.  You can take frozen slices and pop them right in the toaster for some great, fresh toast!

A note about the bread pan: when I first started making this recipe I was using a "regular" bread pan.  It made HUGE slices.  Not the worst problem, but we use this a lot for toast and it didn't fit so well in the toaster!  So I bought a long, skinny bread pan and it makes better size slices.  I have to cook for more like 30 mins with the oven rack lowered to the bottom third position with the long skinny pan.  And I only allow it to rise for 50 minutes before baking, otherwise it ends up rising too much, which creates holes in the loaf.


Enjoy!

Friday, July 26, 2013

Tried & True Recipe: Strawberry Spinach Salad with Poppyseed Dressing


This is a really lovely salad and a new favorite of mine.  Perfect timing as we're in prime berry season!  It's so delicious because it has a wonderful balance of flavors.  You have the tender greens, bright, juicy pops of flavor from the berries, tang from the blue cheese, crunch from the crisp bacon, a delicious creaminess from the avocado, and it's all perfectly complemented by the sweet, tangy poppyseed dressing.  It's a snap to throw together with seasonal ingredients this time of year and is also tasty with some added grilled chicken to make it a little heartier as a main dish.  Give it a try!


Strawberry Spinach Salad with Poppyseed Dressing
Inspired by Lauren's Latest


For the dressing:

2T mayonnaise
1/2 T sugar
1/2 T white vinegar
1/8 t poppyseeds
salt and pepper, to taste

Combine ingredients and set aside.


For the salad:

2 big handfuls spinach and spring mix (or all spinach, or all spring greens, or baby kale, whatever you'd like!)
2-4 strawberries (depending on size) sliced (also delicious with blueberries!  I have both in the salad pictured above.)
1 piece cooked bacon, crumbled
1 tablespoon crumbled blue cheese
1/4 avocado, cut into large dice
Diced grilled chicken (optional)


Layer greens with strawberries, bacon, blue cheese, and avocado.  Drizzle with dressing.

Recipe as written yields one full-sized salad with more than enough dressing.  Leftover dressing can be refrigerated for future use.  Recipe can easily be scaled up to serve 2 or more.


Enjoy!

Tuesday, July 9, 2013

Tried & True Recipe: Zucchini Tots


Zucchini season is starting!  Soon there will be more zucchini to go around than we know what to do with so this is a great recipe to have on hand!

These Zucchini Tots taste kind of like a light mini-quiche.  They're a great way to use up zucchini and make a fun little side dish.  They're quick and easy to put together (Jack loves to help!) and make a great lunch for Jack (he likes them dipped in ketchup, of course).  He calls them 'Kini Tots :)

Once our zucchini plant (hopefully!) starts producing I'm planning to make up a double or triple batch of these and freeze them.  I think it'll work really well and will be nice to have some on hand for really quick lunches!


Zucchini Tots
from Skinnytaste.com

1 cup grated zuccini (about 1 medium)
1/4 cup finely chopped onion
1/4 cup seasoned bread crumbs
1/4 cup shredded cheese (I've used both cheddar and cheddar jack.  I really think any cheese will work!)
1 egg
salt and pepper, to taste


Pre-heat oven to 400-degrees.  Grease mini-muffin tin.

Add shredded zucchini to a towel and squeeze out excess liquid.

Combine all ingredients in a bowl.

Spoon mixture into muffin wells.  Make sure to lightly pack it down as you spoon it in so the tots hold together.  You should get around 12 tots.

Bake for 16-18 minutes, until tops are starting to turn golden brown.


Enjoy!

Thursday, June 20, 2013

Tried & True Recipe: Corn Pudding


Not the best picture, but I'm not exactly the best photographer.  And I was using my cell phone.  At night.  I promise this is a delicious recipe though and you'll really want to try it!  Definitely not the healthiest side (by far), but a truly yummy addition to any meal and it goes especially well with barbeque!  Here I served it alongside some smoked ribs and southern-style green beans.  This casserole has been served in my family for years and it so easy to put together.  It's also a crowd pleaser.  What more can you ask for?  Make it!  Soon!


Corn Pudding

2 Boxes Jiffy Corn Muffin Mix (or substitute real ingredients)
1 Can Corn (undrained)
1 Can Creamed Corn
4T Butter, melted
8oz Sour Cream

Pre-heat oven to 350-degrees.  Combine all ingredients in a bowl.  Pour into a greased 9x13" pan.  Bake, uncovered, for 45 minutes, or until it starts getting golden brown around the edges.


Enjoy!

Friday, April 12, 2013

Tried & True Recipe: Garlic Butter Breadsticks


I've talked about my love of soup and I've shared a few of our favorite soup recipes already.  You know what goes great with soup?  Bread.  Bread goes great with everything (or all by itself!), but I really love it alongside soup so I can dunk it in the broth.  I've already shared a recipe for bread bowls, which are SO delicious, but you have to start those well ahead of time.  If you're looking for something a little quicker (and I often am!) then I love this Garlic Butter Breadstick recipe.  These breadsticks only require a single rise, which cuts the prep time in half.  Because of that, you really don't have to plan too far ahead in order to have some fresh, warm, super delicious breadsticks to enjoy with dinner.  These are supposed to be a copy-cat recipe for Olive Garden breadsticks (and who doesn't love those?!  SO good!), but I've adapted them to be made with half whole-wheat flour making them a little more healthful, but they are still very, very tasty and are certainly reminiscent of the Olive Garden variety. 


Garlic Butter Breadsticks
Adapted from One Particular Kitchen, Originally from Food Network Magazine


For the dough:

2 1/4 tsp instant yeast
1 1/2 cups warm water
2 1/4 cups all-purpose flour
2 cups whole-wheat flour
2 tbsp unsalted butter, softened
2 tbsp sugar
1 tbsp salt


For the topping:

2 tbsp unsalted butter, melted
garlic powder
salt


Combine yeast with water and a pinch of sugar.  Set aside a few minutes to allow yeast to bloom.

Add remaining ingredients to the bowl of a stand mixer fitted with dough hook.  Add yeast/water mixture.  Allow dough to knead on a low speed ~8 minutes.

Turn dough out onto counter and roll into 2 foot long log.  Cut into 16 equal pieces (I cut the log in half, then in half again, etc.).  Roll the pieces into an appropriate breadstick shape and size (keep in mind these will rise some) and place 2-inches apart on a cookie sheet lined with a Silpat or parchment paper.  Cover with a cloth and set aside in a warm spot (I always use my oven with the light turned on) to rise until doubled (~1 hour).

While dough is rising, pre-heat oven to 400-degrees.

Once dough has properly risen, brush breadsticks with melted butter and sprinkle with salt.  Cook in pre-heated oven until very lightly golden, ~12-15 minutes.  Remove breadsticks from the oven and brush with additional melted butter and sprinkle with garlic powder.

Note:  I've had success with freezing the dough before allowing it to rise for later use.  To bake I just place the dough (still frozen) on a baking sheet and allow it to come to room temperature and rise (this takes a couple hours, just keep an eye on it) and then continue on with the recipe as written.  You could also bake off all the breadsticks and freeze some, then just pop them in the oven to re-heat from frozen.  


Enjoy! 

Friday, April 5, 2013

Tried & True Recipe: Tortellini Minestrone


I love soup.  It's warm and comforting and can be very healthful.  It also tends to make a good amount, yielding leftovers to eat throughout the week or to freeze for later.  It's also usually very cost effective because of how many meals you can get out of it.  Mark is not a soup lover, but he puts up with it without too much grumbling throughout the colder months when I like to make at least one soup a week.  Unlucky for him, it's still pretty chilly out so even though we've technically made it to spring, my soup cravings are still going strong!

This Tortellini Minestrone is a recipe I stumbled upon recently and I've already made it a few times.  I love that it has a nice variety of veggies, is meatless, but is still plenty filling because of the pasta and beans, and it's loaded with flavor for a broth-based soup.  It also comes together really quickly so it's perfect even on a weeknight!

I highly recommend you give this one a try while it's still chilly enough to make you crave warm, comforting foods.


Tortellini Minestrone
Adapted from Pink Parsley, originally from Cook's Illustrated, Soups and Stews


1 Tbs extra-virgin olive oil
2 carrots, peeled and chopped
2 stalks of celery, chopped
1 medium onion, finely chopped
5 oz mushrooms, sliced (optional.  I usually leave these out because Mark doens't like mushrooms, but I think they would be very tasty!)
4 garlic cloves, minced
1 tsp dried oregano
3 cups low-sodium chicken broth
2 1/2 cups V8 vegetable juice or tomato juice can be substituted
1 (15-oz) can cannellini beans, drained and rinsed (any white bean can be used.  I've also used chickpeas/garbanzo beans with great success!)
1 (9-oz) package fresh cheese tortellini (preferably whole wheat)
1 medium zucchini, halved lengthwise and chopped
1/2 cup pesto (homemade, or if store-bought, use the refrigerated variety)
1/4 tsp salt, plus additional to taste
ground black pepper, to taste
grated Parmesan, for serving


Heat EVOO in a large pot or dutch oven over medium heat.  Add carrots, celery, onion, 1/4 tsp salt, plus some ground black pepper, to taste, and cook until softened.  (If using mushrooms, add them once the veggies just start to soften.)  Add garlic and oregano and cook just until fragrant.

Stir in broth, scraping up any browned bits from the bottom of the pot.  Stir in vegetable/tomato juice and beans.  Bring to a boil.  Reduce heat to simmer and cook ~10 minutes.

Add pasta and zucchini and continue to simmer until soft and cooked through.

Stir in pesto.  Season with additional salt and pepper, to taste.

Serve topped with a little grated parmesan.


Enjoy!  


Thursday, January 3, 2013

Tried & True Recipe: Ranch or Zesty Potato Wedges


Ranch Potato Wedges are an easy side dish and a family favorite.  They go great alongside just about anything, but I most often serve them with Crock-Pot Shredded Buffalo Chicken Sandwiches, Grilled Buffalo Chicken Sandwiches, or Buffalo Ranch Chicken Wraps.  I think I associate them with buffalo flavored dishes because Buffalo Wild Wings has Ranch Potato Wedges that are delicious and I'm sure quite unhealthy.  So these are my take on a healthier at-home version and they're so easy!


Ranch Potato Wedges

Potatoes*, washed and cut into wedges (I usually get 6-8 wedges per potato)
Extra-virgin Olive Oil, to coat
Ranch Seasoning (store bought or homemade), to taste (~1-2 Tablespoons)


Pre-heat oven to 400-degrees.

In a large bowl toss potato wedges with enough EVOO to coat along with the ranch seasoning.  Dump wedges onto a large, non-stick baking sheet and arrange in a single layer.

Bake for 20 minutes.  Stir and arrange in a single layer again.  Bake an additional 20 minutes or until the edges start to turn golden brown.

Serve with ketchup or ranch dressing to dip.

Enjoy!


*For these wedges I like to use small russet potatoes, like the kind that come in the Value brand bag at Kroger.  2 small potatoes per person seems to work out well.  If you're using a larger potato you might want to plan for 1 potato per person.


Updated 5/19/13: For a Zesty Oven Fries version use the same technique as above but instead of the ranch season with:

1 tsp Onion Powder
1 tsp Garlic Powder
1 tsp Paprika
1/2 tsp Chili Powder
1/2 tsp Salt
1/2 tsp Pepper
(1/4 tsp Cayenne Pepper, optional, if you like a little heat)

Tuesday, November 20, 2012

Tried & True Recipe: Whole-Wheat Pizza Crust

Pictured is an individual-sized Margherita pizza

I've shared recipes for our favorite pizza sauce as well as our take on Margherita and BBQ Chicken pizza toppings.  Now it's time to share our go-to pizza dough recipe.  It's comprised of more than half whole-wheat flour so it's a little healthier than the usual all-purpose white flour recipes and it's so simple to throw together and easy to work with.  This recipe is easily doubled if you want to make two pizzas (or you could split one recipe into two single-serve pizzas) or you can freeze a ball of dough to pull out to use another day or make up a second pizza at the same time and pop it in the freezer before the final bake for a homemade frozen pizza waiting for a busy day when you need a quick meal.  I've also used this dough to make sandwich braids, calzones, and stromboli, but we most often use it for pizza.  Very versatile! 


Whole-Wheat Pizza Dough
adapted from Confections of a Foodie Bride

Yields 1 ~14-inch crust (depending on how thick or thin you like your crust)

3/4 c. Warm Water
2 1/4 t. (or one package) Active Dry Yeast
1 t. Honey (or you could substitute sugar)
3/4 c. All-purpose Flour
1 c. Whole-wheat Flour
1/2 t. Salt
1 1/2 t. Extra-virgin Olive Oil (plus additional for brushing on crust)


Combine water, yeast, and honey (I usually just do this right in the measuring cup) and set aside.

To the bowl of your stand mixer fitted with dough hook (or in a large bowl) add flours, salt, and EVOO.  Once the yeast/water mixture is frothy (~5 minutes) add to other ingredients.  Knead on medium speed (or by hand) ~8 minutes.

Cover mixer bowl with a towel and set aside in a warm place (I usually put it in my oven with just the light on) to rise for 1 hour, 15 minutes or until doubled in size.

Pre-heat oven to 450-degrees (don't forget to remove your dough first if you're using the oven to let it rise :) ).

Lightly grease pizza pan.  Press dough out to your desired thickness.  Lightly brush dough with EVOO (I usually just concentrate around the edges).  Bake for 7 minutes.  Remove crust from the oven and top with desired toppings.  Bake for 10-12 minutes or until cheese is bubbly and beginning to brown.

Enjoy!

Thursday, October 25, 2012

Tried & True Recipe: Baked Sweet Potato Fries


These aren't really fries considering they're not fried.  They're actually seasoned and roasted sweet potatoes, but they're cut into a fry shape, we eat them in place of fries, and dip them in ketchup, so fries they are!

These are definitely one of our favorite sides and something you see pop up in our weekly meal plans often.  They're cheap, healthy, everyone likes them (Jack LOVES them!), and they're so easy to make!  They pair well with just about anything.  We often eat them alongside of burgers, grilled chicken sandwiches, panini, and they also pair well with Mexican-style cuisine.  Jack can eat a whole sweet potato's worth of these "fries" and I love that it's a veggie side I know he'll happily eat every time!


Baked Sweet Potato Fries
adapted from Fitness Magazine via With a Cherry on Top

2-3 Sweet Potatoes*, peeled and cut into fry-shape
1/2 t. Salt
1/2 t. Cumin
1/2 t. Chili Powder
1/2 t. Paprika
1/4 t. Pepper
1/8 t. Cayenne Pepper (feel free to omit this if you don't want any heat)


Pre-heat oven to 425-degrees.

Combine spices in a small bowl and set aside.

Place potatoes in a single layer onto a greased, or parchment paper-lined baking sheet (you may need 2 baking sheets depending on their size and the amount of potatoes you are making.  You can put them pretty close together, but don't overcrowd the pan!).

Sprinkle spices evenly over sweet potatoes.**

Bake for 20-25 minutes until the edges start to get crisp and a little brown.

Serve with ketchup, if desired!


*Number of sweet potatoes will vary based on size and number of people you are serving.  Basically you'll want one sweet potato per person unless they're really small or large.  Use your own judgement :)

**Notes about the spice mix - I actually like to make a good sized batch of this and keep it in an old spice container so it's all ready to go and I don't have to mix it up every time.  Also, I mentioned that Jack likes these.  They're just a touch too spicy for him with the cayenne pepper so I actually make a separate pan for him that I just lightly sprinkle with the chili powder, cumin, and paprika.  That way it's spicy in a flavor sense, which he loves, not a burn your tongue kind of way! 

Friday, October 19, 2012

Tried and True Recipe: Creamy Tomato Soup


When Mark and I first lived together and I was just entering the world of cooking, one of our go-to meals was canned tomato soup paired with grilled cheese.  We both liked it, it's relatively cheap, and it takes about 10 minutes to make.  Add some Cheez-Its on the side and you've got a quick, tasty meal that reminds you of childhood.

The problem is, well, there are a few problems actually.  First, the canned stuff just isn't good for you.  It's not real food.  It contains additives to prolong shelf life, ingredients like high fructose corn syrup and "flavoring" (which could be anything, it doesn't have to be disclosed), as well as unnecessary amounts of sodium.  Now, I'm not totally against taking a short cut here and there and if you want to pop open the occasional can of soup on a busy day I'm not here to judge!

The other part of the problem for us is that as our diet has evolved to be comprised of predominately real foods made from scratch the processed stuff just doesn't taste good to us anymore.  It's actually kind of a bummer when you're wanting to take a shortcut, but ultimately it's a good thing.  I think it was some time last year, after I had been making my version of tomato soup for a while, that we popped open a can of the Campbell's variety for lunch one day and it was awful.  It had no flavor.  It basically just tasted like salt.  No bueno.  I used to eat quite a bit of canned soup, especially when I was working for a quick lunch, not to mention Mark and I both grew up on the stuff, but I guess our taste buds are just changing!

The good news is, there is an alternative for that comfort food meal of tomato soup and grilled cheese.  It's super easy to make, yields a good amount, and is freezer friendly if you want to keep some on hand.  The best part is, it's delicious! 


Creamy Tomato Soup
adapted from The Pioneer Woman

6T unsalted butter
1 medium onion, diced
28 oz. diced tomatoes
46 oz. tomato juice
1 1/2 T chicken base
3T sugar
1t dried parsley
1t dried basil
salt and pepper, to taste
a good splash of dry sherry (~1/4 - 1/3c., this is optional, but I like to add it.  I think it adds a nice, mild background flavor)
1 1/2 c heavy cream

In a large pot or dutch oven melt butter over medium heat.  Add onion and saute until soft and translucent.  Add tomatoes, tomato juice, chicken base, sugar, and spices.  Cook, stirring occasionally until it comes to a bubble.  Add sherry, if using, and continue to cook for another minute or two.  Turn off heat and slowly stir in cream.  Puree until smooth with an immersion blender (or carefully in batches in a regular blender).


Enjoy!

Wednesday, October 10, 2012

Tried and True Recipe: Artisan Bread Bowls

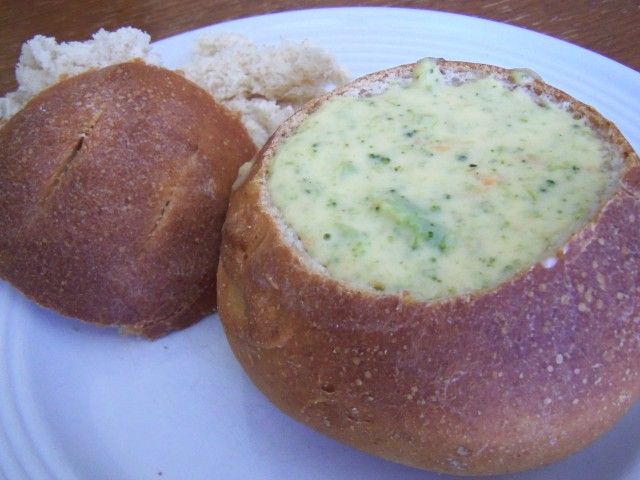
Bread bowl pictured is filled with Broccoli Cheddar Soup

Soup is exactly 252 times tastier when served in a bread bowl.  It's a scientific fact, one not to be argued with.  I love soup of all kinds and I love bread so eating them together is pretty much a no brainer, especially when you can eat the soup out of a bowl made of bread.  Sheer brilliance.

This is a great all-purpose bread bowl.  It has a great texture and mild flavor, wonderful to fill with just about any kind of soup, chili, or stew you can think of.  And considering we're headed into soup season, this is must have recipe!

The process to create these bread bowls is not at all labor intensive, but when all the rising/chilling time is considered I would recommend planning to make these up, pop them in the fridge, and then bake them off the next day.  When I made them I did do it all in one day, so it's do-able, just plan to start them in the morning if you want them the same day.  Whatever floats your boat!


Artisan Bread Bowls
Adapted from King Arthur Flour and Mel's Kitchen Cafe

yields 5-6 bread bowls

1 1/2 cups warm water 
2 teaspoons yeast
pinch of sugar
3 3/4 cups all-purpose flour
1/2 cup whole wheat flour
1/4 cup nonfat dry milk
2 teaspoons salt
2 tablespoons extra-virgin olive oil


Combine yeast with water and a pinch of sugar.  Stir and set aside to bloom.  Water/yeast mixture will be ready in a few minutes when it's nice and frothy.

Meanwhile, add remaining ingredients to the bowl of a stand mixer fitted with dough hook (or just a large bowl if making by hand).  Add water/yeast mixture when it's ready.  Turn to medium-low speed and allow mixer to knead mixture for ~8 minutes, until a nice, smooth dough is formed.  (Alternatively, mix and knead by hand).  Remove dough hook, cover bowl, and set aside to rise for 45 minutes.

Punch down and divide dough into 5-6 equal pieces (depends on your size preference.  I usually make 6 bowls, but they are on the small side).  Roll each piece into a nice, round ball and place on a baking sheet that has been lightly greased, lined with parchment paper, or lined with a Silpat liner (which is what I use).  Cover entire sheet with lightly greased plastic wrap and place in refrigerator.  Refrigerate dough for a minimum of 4 hours up to a maximum of 24 hours.  This step will allow the dough to develop flavor and texture, so don't skip it!

After 4-24 hours, remove bread dough from the refrigerator.  Allow to sit, covered, at room temperature for 1 1/2 hours.  Remove plastic wrap and allow dough to sit at room temperature uncovered for and additional 30 minutes.  During this time, pre-heat oven to 425-degrees.

Just before baking, slash the top surface of the dough a few times with a sharp knife to allow for expansion while baking.  Bake 22-28 minutes until bowls are golden brown and sound hollow when tapped.

Remove from oven and cool on a wire rack.

To serve, cut round from top at an angle and pull out some of the extra bread from the inside (save all this to dunk in that yummy soup!) to make a bowl.  Fill with your favorite soup, stew, or chili!

Friday, September 28, 2012

Tried and True Recipe: Pizza Sauce


Homemade pizza makes a frequent appearance on our weekly menu plan.  It's something that everyone likes, especially Jack.  Not only is it healthier to make our own, but it's far cheaper than getting take-out, and it doesn't take too much effort to make from scratch!  We often make Buffalo and BBQ Chicken varieties, but when we take the more traditional route this is the pizza sauce we use to top our favorite whole-wheat pizza crust.

We prefer a thick, rich sauce and I've tried lots of different recipes looking for the sauce that we like best.  After some experimentation, this is it!  This recipe makes enough for 2-3 pizzas depending on the size of your pizza (ours is usually a ~14-inch round) and how saucy you like it, but it freezes great so I love to stash the extra in the freezer for next time and sometimes I'll make a double batch and freeze a bunch of individual portions to have on hand.


Pizza Sauce
Adapted from Food.com

2T extra-virgin olive oil
1/2 cup onion, finely chopped (this is ~1/4 of a large onion, or 1/2 of a regular one)
1-2T minced garlic (a few good sized cloves)
14.5 oz. crushed tomatoes
8 oz. tomato sauce
6 oz. tomato paste
2t. dried oregano
2t. dried basil
1t. salt
pinch of sugar

In a medium sauce pan, heat EVOO over medium heat.  Add onion and saute until soft and translucent.  Add garlic and saute until fragrant.  Add remaining ingredients and bring to a simmer.  Reduce heat and simmer, stirring occasionally, for 30 minutes (you'll probably want to put a lid on it at this point so sauce doesn't get everywhere.  Tomato sauces are MESSY!  Just don't cover it completely, offset the lid a little to allow steam to escape.).

That's it!  Use it to top your favorite pizza.  It's also good to dip breadsticks and stromboli in.  Freeze any leftovers and thaw as needed.


Sunday, August 26, 2012

Tried & True Recipe: Grilled Buffalo Chicken Sandwiches


This is not at all a difficult recipe, but you may have noticed we eat these Grilled Buffalo Chicken sandwiches frequently during grilling season so I thought I'd share how to put them together!


Grilled Buffalo Chicken Sandwiches
Inspired by Grilled Buffalo Chicken recipe featured on Plain Chicken

Ingredients:

2 Good Sized Chicken Breasts (or 4 thin-sliced chicken breasts)
3/4 cup Cayenne Pepper Hot Sauce (such as Frank's Red Hot)
1/4 cup Butter, melted
2 teaspoons Worcestershire Sauce
1/2 teaspoon Onion Powder

For serving:

Lettuce
Tomato
2 tablespoons Sour Cream (or Plain Greek Yogurt)
1 tablespoon Blue Cheese Crumbles
4 Sandwich Buns (store bought or homemade)


Directions:

In a medium-sized bowl, combine hot sauce, butter, Worcestershire sauce, and onion powder.  Remove 1/4 cup of marinade and set aside.

If using full-sized chicken breasts carefully slice in half horizontally to get 2 thin-sliced pieces from each breast.

Add chicken to marinade and let sit at room temperature for 20 minutes (don't try to stick it back in the fridge or the butter in the marinade will harden.  It's best to take the chill off meat before grilling it anyway!).  Meanwhile, pre-heat the grill (or this is where The Husband comes in if it's my house).

Grill chicken until cooked through and then brush with reserved marinade.

While chicken is cooking, make the blue cheese sauce by combining the sour cream (or greek yogurt) and blue cheese crumbles.  I like to kind of mush this mixture with a fork so the crumbles aren't so big and it's combined well.  (If you don't like blue cheese a little schmear of ranch dressing would be good instead.)

Once chicken is cooked assemble sandwiches by adding chicken, tomato, lettuce, and blue cheese sauce to a sliced bun.


I usually serve these sandwiches with baked ranch potato wedges, but as you can see I was eating leftovers for lunch with some kettle chips on the side.  Can't go wrong either way!

Enjoy!

Monday, December 26, 2011

The BEST Cinnamon Rolls and Other Holiday Baking


One of the best parts of the holidays is enjoying lots of treats guilt-free!  It's all part of the festivities, right?!  As a result, I have a few new tried and true recipes to share :)

I have to just go ahead and say, a photographer, I am not.  I can't take good pictures even when I try, but I didn't even try with these.  I just snapped quick pics in the midst of the baking frenzy so just imagine how good they actually look in real life because, trust me, all of these treats not only look better in-person, but they taste phenomenal!


Winner, winner chicken dinner!  I would have to say these are the best cookies I've had recently (although, there are several close runner ups ;) ); substantial, chewy, and the oatmeal-peanut butter-chocolate combo is beyond yummy!  And an added bonus, using red and green M&Ms make them festive for Christmas, but using any other color can make them festive any time of year!  You MUST try these!  


A great snowball cookie!  Some recipes completely pulverize the nuts, but I liked that this recipe calls for bigger pieces of pecans.  This cookie is nice and buttery!


Rugelach

I made these for Hanukkah as we celebrate both Hanukkah and Christmas in my family.  These turned out wonderfully!  If you've never had Rugelach it's kind of more of a pastry than a cookie, I'd say.  It has a nice buttery, flaky dough which can be filled with any number of things: fruit, chocolate, nuts, or even poppy seed paste!  I like to make mine with apricot preserves and walnuts or pecans.  I follow this recipe for the dough, but when it's time for the filling I just spread on some apricot preserves and finely chopped nuts.

Not pictured, but definitely worthy enough to note: Chocolate Pecan Bourbon Pie

And now, onto THE cinnamon rolls! 

Cinnamon Roll-y Goodness

I adapted these cinnamon rolls from the famous Clone of a Cinnabon recipe found on Allrecipes.com.  It's one of the most highly rated recipes on their site and has 5 stars out of a possible 5 based on more than 4500 reviews!  That HAS to be a great recipe, right?  Right!  This is my second time making these and they are gooOOOD!  I adapted the recipe to make  the dough without the bread machine the original instructions call for and I made my own frosting this time, which I prefer to that provided as part of the recipe.  I like to bake off half and freeze the other 6 rolls to make later.  My adapted recipe is below.


The BEST Cinnamon Rolls 

Yield: 12 rolls


Ingredients:

1 cup warm milk (approximately 100 degrees F)
2 1/2 teaspoons active dry yeast
4 - 4 1/2 cups bread flour
1 teaspoon salt
1/2 cup white sugar, divided
2 eggs, room temperature
1/3 cup unsalted butter, melted


Filling:

1 cup brown sugar, packed
2 1/2 tablespoons ground cinnamon
1/3 cup butter, softened


Frosting:

4-ounces (1/2 block) cream cheese
1/4 cup (1/2 stick) unsalted butter, softened
1/2 teaspoon vanilla
1 1/2 cup confectioner's sugar
1/8 teaspoon salt
1/2 tablespoon milk


Directions:

Add yeast and 1 teaspoon sugar to warm milk.  Stir and set aside to allow yeast to bloom (this will take approximately 5 minutes).

Meanwhile, to the bowl of a mixer (or just a large bowl if you're making the dough completely by hand) add 4 cups of flour, salt, a scant 1/2 cup of white sugar, eggs, and butter.  Once the yeast has activated, add the milk/yeast/sugar mixture to the mixer bowl.  On low-to-medium speed allow ingredients to combine (add additional flour, a few tablespoons at a time, up to an additional 1/2 cup as needed) and then continue allowing dough to knead for about 8 minutes.

Once dough is finished kneading, remove bowl from mixer, cover with a towel, and set aside to rise.  Tip: I like to allow my doughs to rise in the oven with the light on.  It provides just enough warmth to help aid the rising process.  Allow dough to rise until doubled in size (1- 1 1/2 hours).  Tip: check the dough to see if it has risen enough by pressing 2 of your fingers 1/2-inch into the center.  If the indentations remain after you remove your fingers the dough has doubled in size and is ready for the next step.  If they disappear, the dough needs more time to rise.

Once the dough has doubled in size, turn dough out on lightly floured surface and cover with a towel.  Allow dough to rest 10 minutes.  Meanwhile, combine brown sugar and cinnamon for filling.

Roll dough into a 16 x 21-inch rectangle.  Spread dough with melted butter (I like to use my hands for this) then sprinkle with cinnamon-sugar mixture leaving a 1-inch strip on one of the long sides bare.

Roll the dough tightly going towards the side with the uncovered 1-inch strip.

Once rolled, gently squeeze the log to make it even.  Pinch seam closed (this is why you leave the 1-inch strip uncovered, so it seals well!).

If you have ends that are uneven or aren't well formed cut a bit of the extra dough off so that the log is even. Gently cut log into 12 cinnamon rolls using a serrated knife or unflavored dental floss. 

Place rolls into lightly greased baking pan (I use 2 8-inch rounds since I only bake off 6 rolls at a time, you can also bake all 12 in a 9 x 13-inch pan).

At this point you can do a few different things:

     -If baking immediately: cover and let rise until nearly doubled (approximately 30 minutes).
  
     -If baking the next day: cover with plastic wrap and place in the fridge.  When you are ready to bake, remove from the fridge 30 minutes - 1 hour before baking to take the chill off.  Then, bake as usual!
  
     -If freezing for future use: cover well with foil or combo of foil and plastic wrap and place in freezer.  When you are ready to bake take them out the night before and let them sit on the counter to defrost and rise.  Then bake as usual!

To bake:  Bake at 350-degrees for 20-25 minutes, until golden brown.  Tip:  to check doneness of yeast bread tap the top.  If it sounds hollow the bread is done!  Cover with foil if the rolls seem to be getting too brown, too quickly. 

For frosting:  combine all ingredients and mix until smooth.  Frosting can be made while rolls are baking, or it can be made ahead of time and refrigerated or frozen until ready to use.

Thursday, June 16, 2011

Tried and True Recipe: Chipotle-Inspired Chicken Burritos


We love Chipotle around here, but we really make an effort not to eat out too often.  Although Chipotle is a fairly cheap option and it's not too bad for you (well, the stuff IN it isn't so bad, the size of it is!), I can make a similar meal at home for about half the cost of take-out and no one has to go out in rush hour traffic and stand in a line out to the door to pick it up!

These Chipotle-inspired burritos will definitely be on our regular meal rotation from now on!

To make a Chipotle burrito the way I like it you will need the following:

Pico de Gallo
Cilantro-Lime Rice
Seasoned Grilled Chicken
Black Beans  (Canned or homemade, I cook mine from dried beans in the CrockPot), heated
Burrito Shells (I like to use whole-wheat, but use your favorite homemade or store bought variety)
Cheese (Monterey Jack would probably be closest to what they have at Chipotle, but I used Cheddar Jack)
Sour Cream

Start by making the Pico de Gallo so that it can chill while you're making everything else.

Pico de Gallo
a Stephanie Original

3 Plum Tomatos (or other small, ripe variety), seeded and diced
3 tbsp. Red Onion, diced small
1/2 Jalapeno, ribs and seeds removed, diced small
2 tbsp. Cilantro, finely chopped
Juice of 1/2 Lime
1/2-1 tsp. Kosher Salt (to taste)

Combine all ingredients in a bowl and mix to combine.  Chill at least 30 minutes - 1 hour prior to serving.


Next make the Cilantro-Lime Rice.

Cilantro-Lime Rice
Recipe courtesy of C+C Marriage Factory

1 cup Basmati Rice
Juice of 1/2 Lime
2 cups Water
1 tsp. Salt
3 tbsp Cilantro, chopped
4 tsp Vegetable Oil, divided


In a medium sauce pan, add rice, water, 1 tsp. oil and salt. Turn heat to high and boil until most of the water evaporates. When the water just skims the top of the rice, reduce heat to low, cover, and continue cooking for 15 minutes. Shut off heat and keep covered pan sitting on burner for additional 5 minutes.  Remove from burner and fluff rice with a fork.  Stir in remaining ingredients: lime juice, cilantro, and remaining 3 tsp. of oil.

While rice is cooking have your husband (or DIY if you know how ;) ) heat the grill and cook chicken.  I take some boneless, skinless chicken breasts season with homemade taco seasoning, drizzle with extra-virgin olive oil and then Mark does the rest.  After chicken is cooked, cube it into bite-sized pieces. 

Update 4/5/2013: We've been marinating the chicken rather than just seasoning it and wow does it make for extra tasty chicken!  If you want a quick short cut, just season and oil the chicken as described above, but it's really not that big of a deal to toss it into a quick marinade at the same time that you get the Pico de Gallo together so I highly recommend you do the following:

Chipotle Chicken
Adapted from Simply Scratch

1 large or 2 smaller chicken breasts, sliced in half lengthwise
1 tbsp. Lime juice
small handful of Cilantro, chopped
1 Chipotle pepper in Adobo, minced
1/2 tbsp. Chili powder
3/4 tsp. Cumin
1/2 tsp. Kosher salt
1/2 tsp. Pepper
1/4 tsp. Paprika
1/8 tsp. Dried Oregano
1/8 tsp. Garlic powder
1/8 tsp. Onion powder
OR 1 Tbsp. of taco seasoning can be substituted for the spices if you already have it mixed up and ready to go
2 tbsp. Exra-virgin Olive Oil

In a bowl, combine all ingredients minus chicken.  Once well combined, add the chicken and toss to get it coated well with the marinade.  Refrigerate.  Allow chicken to marinate for 1 hour.  Then proceed to grill and cube as directed above.

To assemble burritos:

To a shell add rice, chicken, black beans, pico de gallo, sour cream, and cheese to your heart's delight. 

Wrap it up, eat, and enjoy! 

Tuesday, March 22, 2011

Tried and True Recipe: Broccoli Cheddar Soup

Broccoli Cheddar Soup is pictured in an Artisan Bread Bowl


I don't know about you, but I love me some Panera!  They have yummy soups, salads, and sandwiches and it's a pretty good choice if you're eating out.  I especially like their Pick 2 option where you can choose 1/2 sandwich and a bowl of soup, or 1/2 a salad and a bowl of soup, or 1/2 a sandwich and 1/2 a salad.  Not to mention their yummy coffee drinks... or their chai lattes... or the iced green tea that is probably mostly sugar... YUM!

What I don't love is their price.  You definitely pay a premium price for their product even though it's a chain and for two people to get a meal and a drink each, it's definitely not a cheap eating option!  But it's goooooood... mmMmmm! 

Anyway, a while back I realized that I'm quite capable of recreating some of our Panera favorites at home where it's a lot less expensive, we have leftovers, and I control everything that goes into the meal. 

One of my favorite Panera copycat recipes is this Broccoli Cheddar Soup.  I made it for the 3rd or 4th time this weekend and I think I've finally perfected the recipe.  Not only is it good, but it's a snap to pull together!


Panera-like Broccoli Cheddar Soup
Adapted from Food Network via Amber's Delectable Delights


Ingredients

4 tablespoons unsalted butter
1 small onion, chopped
1/4 cup all-purpose flour
2 cups half-and-half
3 cups low-sodium chicken broth
2 bay leaves
pinch freshly grated nutmeg
Kosher salt and freshly ground pepper
4 cups broccoli florets (about 1 head)
1 large carrot, grated
2 1/2 cups (about 8 ounces) sharp cheddar cheese*, shredded


Directions

Melt the butter in a large Dutch oven or pot over medium heat. Add the onion and cook until tender, about 5-10 minutes. Whisk in the flour and cook until golden, 2 to 3 minutes, then gradually whisk in the half-and-half until smooth. Add the chicken broth, bay leaves and nutmeg, then season with salt and pepper and bring to a simmer. Reduce the heat to medium-low and cook, uncovered, until thickened, about 20 minutes.

Meanwhile, add the broccoli florets to a steamer basket and lay the grated carrot on top of that.  Cover with a lid and steam until tender, about 5 minutes.  Set to the side until soup has finished thickening.

Add the broccoli and carrot to the broth mixture and continue to simmer, about 15 minutes. Discard the bay leaves. Puree the soup in the pot with an immersion blender.  I like to do this very carefully so that it does not get completely smooth.  I just pulse the blender a few times so that some of the veggies get pureed into the soup and others remain in chunks.  (If you do not have an immersion blender you can puree batches in a regular blender until you reach desired consistency; Return to the pot.)

Add the cheese to the soup and whisk over medium heat until melted. Add up to 3/4 cup water if the soup is too thick.
 
This soup also reheats well.  I find that although I don't usually need to add additional water when I first make it, I do need to add a bit when reheating to thin it out.
 
Enjoy!
 
 
*Note: When you are making a recipe where you want the cheese to melt into something, like this soup, you really need to use a block of cheese that you shred yourself rather than the pre-shredded, bagged kind.  Pre-shredded cheese is coated with anti-caking agents to help it remain clump-free in the bag, which also keep it from melting smoothly!  I grate our cheese right in the food processor with the grating blade and it hardly takes any time at all!